library(meme)
u <- system.file("success.jpg", package = "meme")
meme(u, "JUST CREATED MY FIRST", "R PACKAGE!")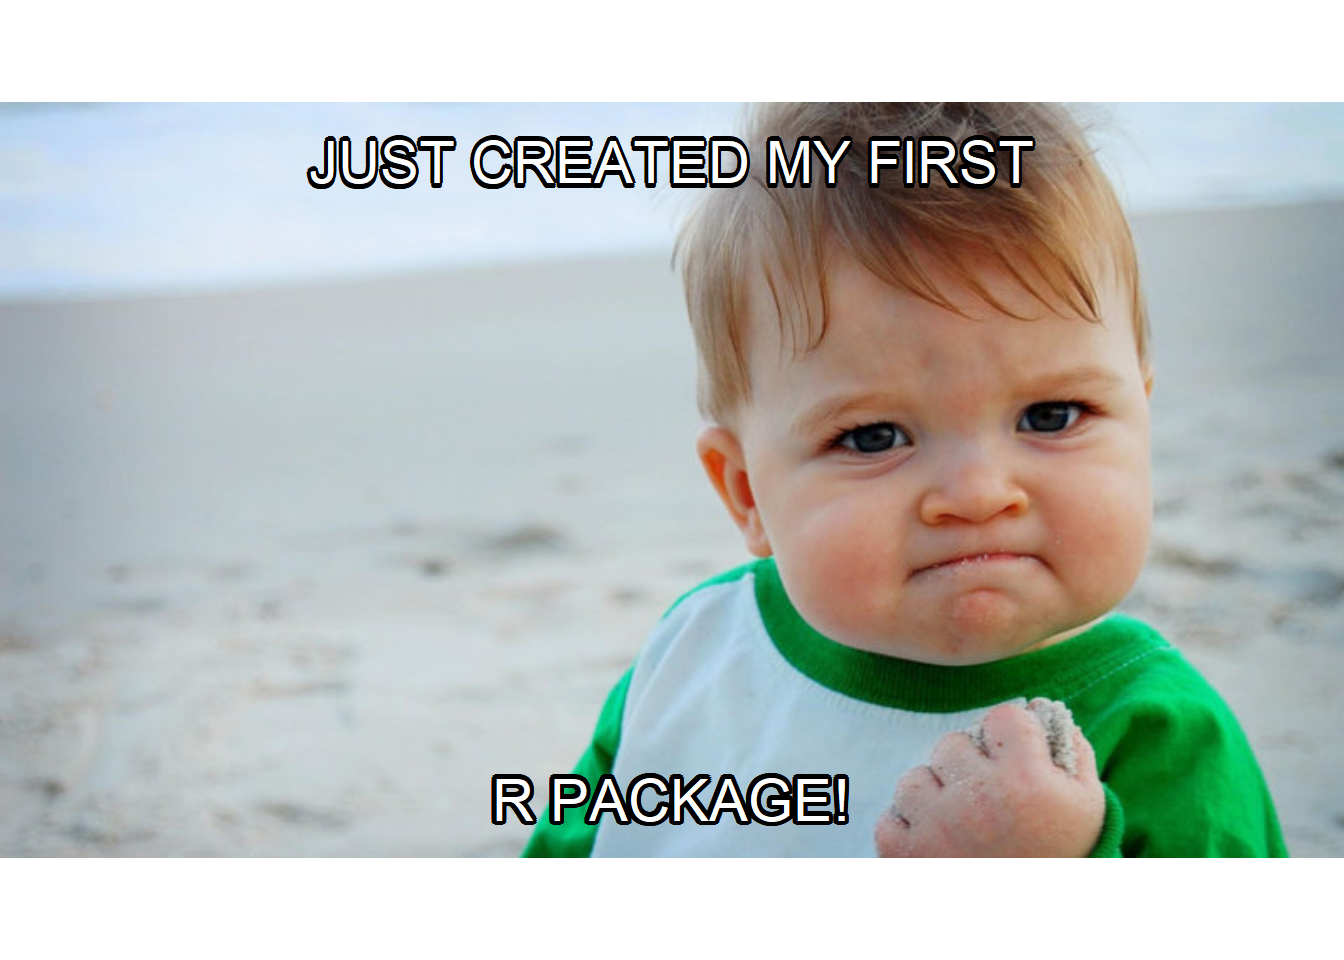
In this post we provide an introduction on how to create R packages. Resources that have been used to write this post and that can be read to better understand and expand on the material covered here are the following:
R packages https://r-pkgs.org/
R package primer: https://kbroman.org/pkg_primer/
Mastering Software Development in R: https://bookdown.org/rdpeng/RProgDA/
Writing R extensions: https://cran.r-project.org/doc/manuals/R-exts.html
Package development: https://support.rstudio.com/hc/en-us/sections/200130627-Package-Development
Package websites with pkgdown: https://pkgdown.r-lib.org/index.html
rOpenSci Packages: Development, Maintenance, and Peer Review: https://devguide.ropensci.org/
rOpenSci Statistical Software Peer Review: https://stats-devguide.ropensci.org/
R packages provide a way to distribute R code, data and documentation. R packages can be shared for reuse by others in several ways. For example, they can be contributed to the Comprehensive R Archive Network (CRAN), put in GitHub, or distributed privately using files shares.
R packages are directories with subdirectories containing R functions, data, documentation and other information. The minimal requirements for an R package are the following:
R that contains R files with functionsman that contains the documentationDESCRIPTION file with metadata for the package such as the name, version number and authorNAMESPACE file that specifies exported functions that can be accessed by the users and imported functions from other packagesdata, tests and vignettes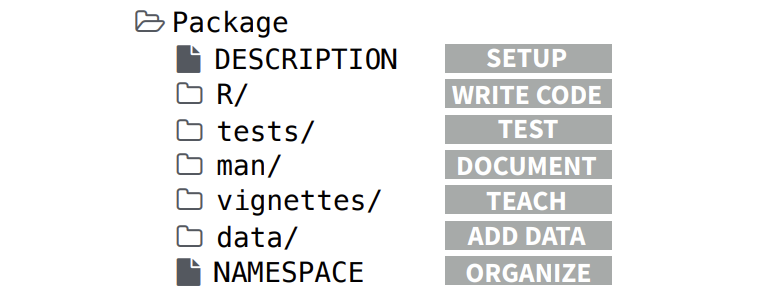
https://rawgit.com/rstudio/cheatsheets/main/package-development.pdf
The contents of a package can be stored as
.tar.gz)To create an R package, we can use the devtools and usethis packages which include a variety of tools aimed at package development. The roxygen2 package allows us to easily create documentation for the functions and data contained in the packages. The following functions are key for package development.
usethis::create_package(): creates the file structure for a new packageusethis::use_r(): creates R filesdevtools::load_all(): loads all functions in a package like when a package is installed and attached with library()usethis::use_package(): adds a package dependency to the DESCRIPTION fileusethis::use_data(): saves an object in the R session as a dataset in the packagedevtools::document(): creates documentation files in man/ and the NAMESPACE file from roxygen2 code (it is a wrapper of roxygen2::roxygenize())usethis::use_vignette(): creates a new vignette in vignettes/devtools::check(): builds and checks a package for any ERRORs, WARNINGs, or NOTEsdevtools::install(): uses R CMD INSTALL to install a package
Exercise Inspect the source of the ggplot2 package in GitHub: https://github.com/tidyverse/ggplot2
Exercise Inspect the ggplot2 package on CRAN: https://cran.r-project.org/web/packages/ggplot2/index.html
Here we provide a small example on how to create an R package called mypackage that has a function called fnAreaCircle() that calculates the area of a circle given its radius.
To develop the package, we use the devtools package (which also uses other packages such as usethis for package development).
To start the development of a new R package, we attach the devtools package and call the create_package() function that initializes the components of the package.
library(devtools)
usethis::create_package("C://mypackage")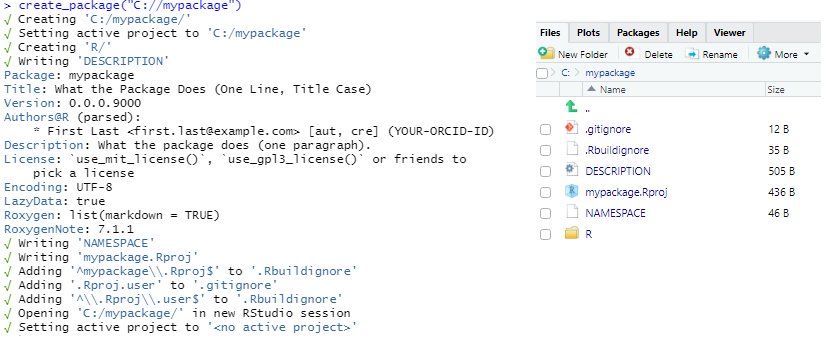
This creates the following files:
RDESCRIPTIONNAMESPACEmypackage.Rproj.Rbuildignore lists files that should not be included when building the R package .gitignore list files that Git should ignore such as some files created by R and RStudio We can add content and modify the R package created. We start by creating R functions in .R files and saving them in the R/ subdirectory of the package. We can use the use_r() function to create and/or open a file in R/.
Here, we create fnAreaCircle.R by using use_r("fnAreaCircle"). Then, we edit the file by adding the function fnAreaCircle() that calculates the area of a circle by passing its radius.
use_r("fnAreaCircle")fnAreaCircle <- function(r){
area <- pi*r^2
return(area)
}We can test the R functions created by calling load_all(). load_all() makes the R functions available for use, as when we attach the package via library().
load_all()
fnAreaCircle(2)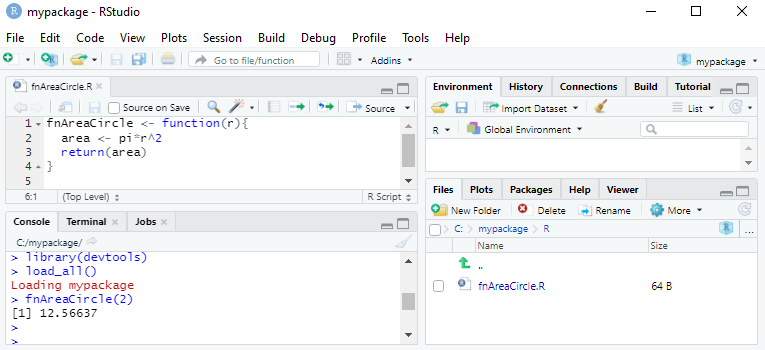
Then, we can use check() to check whether the full package works.
check()
The output of check() shows a Warning because a license for the package was not chosen. For this example, let us choose the MIT license. We run use_mit_license() and this creates LICENSE.md. Then, we run check() again.
use_mit_license()
check()
Since the output of check() shows no errors or warnings, we can now install our package with install(). Then, we can attach the package with library() and use it. In RStudio the Build menu has also functionality to check and install the package.
install()
library(mypackage)
fnAreaCircle(2)After installing and attaching the package with library(mypackage) we try to execute fnAreaCircle() but we get an error.

This is because by default, the functions in a package are only available for internal use. We can make the functions available so users can call them by putting @export in a roxygen comment above the function. roxygen comments start with #' to distinguish them from regular comments.
#' Calculate the area of a circle given its radius
#'
#' @export
fnAreaCircle <- function(r){
  area <- pi*r^2
  return(area)
}Then we run devtools::document() to (re)generate a NAMESPACE file. We can learn more about roxygen and NAMESPACE in the sections below.
devtools::document()
Then we check and re-install the package. We see that now the package works!
check()
install()
library(mypackage)
fnAreaCircle(2)
Exercise Find the folder where the new package has been installed and inspect its components. .libPaths() can be used to get the directory of the R packages.
Exercise Create a package mypackage2 that contains a function fnAreaRectangle() to calculate the area of a rectangle given the length of its sides.
Just created my first R package!
meme package: https://cran.r-project.org/web/packages/meme/vignettes/meme.html
library(meme)
u <- system.file("success.jpg", package = "meme")
meme(u, "JUST CREATED MY FIRST", "R PACKAGE!")
https://r-pkgs.org/r.html
The R/ subdirectory contains all the R code as a single or multiple files.
https://r-pkgs.org/description.html
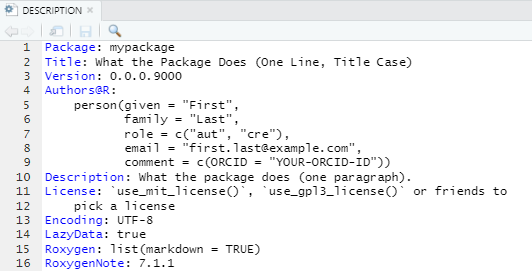
The DESCRIPTION file stores metadata of our package such as name, version number, author, license and dependencies on other packages. The image below shows the DESCRIPTION file created when executing create_package().
The DESCRIPTION file contains the fields Imports and Suggests to declare the packages that our package needs to work. Imports lists packages that are strictly needed. Suggest lists packages that are not strictly necessary but that can be needed to run tests or examples in the documentation.
Packages listed in Imports are installed any time our package is installed (but they are not be attached as when we execute library()). Packages listed in Suggests are not automatically installed when our package is installed.
When writing our package, the best practice is to refer to external functions using package::function() to make it easy to identify which functions are from other packages.
Packages in Imports and Suggests are written as comma-separated list of package names. It is recommended putting each package in one line and in alphabetical order. We can add packages to Imports and Suggests with usethis::use_package(). We can also execute usethis::use_tidy_description() regularly to order and format the DESCRIPTION fields. For example,
usethis::use_package("sf") # Default is "Imports"
usethis::use_package("leaflet")
usethis::use_package("ggplot2")
usethis::use_package("DT", "Suggests")
usethis::use_tidy_description()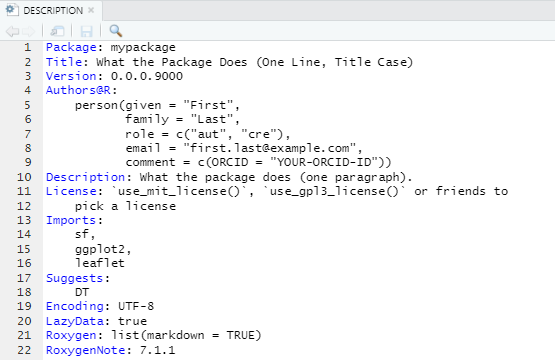
Exercise
Add packages to the Imports and Suggest fields of the DESCRIPTION file.
https://r-pkgs.org/namespace.html
The NAMESPACE file specifies the functions in the package that are exported to the user, and functions or packages that are imported by the package. Exported functions are functions from our package that are accessible by the user, and imported functions are functions from other packages used by our package.
Below is the NAMESPACE file for the mvtsplot package.
export("mvtsplot")

import(splines)
import(RColorBrewer)
importFrom("grDevices", "colorRampPalette", "gray")
importFrom("graphics", "abline", "axis", "box", "image", "layout",
           "lines", "par", "plot", "points", "segments", "strwidth",
           "text", "Axis")
importFrom("stats", "complete.cases", "lm", "na.exclude", "predict",
           "quantile")
Functions are exported to make it accessible by the user with export(functioname).
import(packagename) allows us to access all exported functions of an external package. importFrom(packagename, functionames) imports the functions of a specific package.
Every package mentioned in NAMESPACE must also be present in the Imports or Depends fields of DESCRIPTION.
:: operatorThe :: operator can be used to access a function without attaching the package. If the package is already installed, we could call packagename::functionname(). Alternatively, we could also execute library(packagename) first and then functionname().
It is recommended to list packages in the Imports field in DESCRIPTION so it is installed, but not in NAMESPACE. Then we refer to the functions in the packages explicitly with packagename::functioname().
The use of packagename::functioname() avoids confusion in case there is more than one package with the same function name, and clarifies the package the function belongs to.
https://r-pkgs.org/data.html
We can include data in our package in three ways:
data/. These data are available to the user and can be, for instance, data for examples. Each file in data/ should be a .rda file created by save() containing a single object with the same name as the file.R/systdata.rda. These data are not available to the user and can be, for instance, data that the functions of our package need.inst/extdata. When a package is installed, all files and folders in inst/ are moved to the top-level directory, so raw data cannot have names like R/ or DESCRIPTION.Data can be created with the following code:
# External data
x <- sample(1000)
usethis::use_data(x, mtcars)
# Internal data
x <- sample(1000)
usethis::use_data(x, mtcars, internal = TRUE)We can refer to files in inst/extdata with system.file(). For example:
system.file("extdata", "iris.csv", package = "readr", mustWork = TRUE)

# mustWork logical. If TRUE, an error is given if there are no matching files.
The DESCRIPTION file can include LazyData: true which means the datasets will be lazily loaded, that is, they will not occupy any memory until we use them. When we use usethis::create_package(), LazyData: true will be included.
Exercise Inspect the data in the ggplot2 package here https://github.com/tidyverse/ggplot2
Exercise Check the location of image files in the meme package in GitHub (angry8.jpg, success.jpg, etc.) (https://github.com/GuangchuangYu/meme/tree/master/inst). Then, check the location of image files in the meme package in the installed package in your computer (meme/). .libPaths() can be used to get the directory of the R packages. We see that in GitHub images are in inst/ and in the installed package images are in the top-level directory.
https://r-pkgs.org/man.html
The man/ directory contains the documentation files for the exported objects of a package. To document the functions and data in a package, we need .Rd files written in Latex-style notation in the man/ directory. Instead of writing the .Rd files by hand, we can add roxygen2 comments to the .R files and then run devtools::document() to convert the roxygen comments to .Rd files in man/. roxygen comments start with #' to distinguish them from regular comments and allow us to inclue tags (e.g., @param, @return, etc.)
This is an example of documentation of a function:
#' Add together two numbers
#'
#' @param x A number.
#' @param y A number.
#' @return The sum of \code{x} and \code{y}.
#' @examples
#' add(1, 1)
#' add(10, 1)
add <- function(x, y) {
  x + y
}
To preview function documentation, we use ?fn or help("fn"). This makes R to look for an .Rd file in man/ containing \alias{"fn"}. Then converts it into HTML and displays it.
We can use roxygen to document a package as a whole and provide a help page for our package. Package documentation can be accessed with ?packagename.
There is no object that corresponds to a package, so we need to document NULL. We need to write @docType package and @name packagename Documentation of a package can be saved in a file called packagename.R For example:
#' foo: A package for computating the notorious bar statistic
#'
#' The foo package provides three categories of important functions:
#' foo, bar and baz.
#'
#' @section Foo functions:
#' The foo functions ...
#'
#' @docType package
#' @name foo
NULL
#> NULLObjects in data/ are always exported and they must be documented. Instead of documenting the data directly, we document the name of the dataset and save it in R/. We never @export a data set.
Below is an example of the documentation of the data diamonds in ggplot2 which is saved as R/data.R. More examples of the documentation of the data in ggplot2 are here: https://github.com/tidyverse/ggplot2/blob/main/R/data.R
#' Prices of 50,000 round cut diamonds.
#'
#' A dataset containing the prices and other attributes of almost 54,000
#' diamonds.
#'
#' @format A data frame with 53940 rows and 10 variables:
#' \describe{
#'   \item{price}{price, in US dollars}
#'   \item{carat}{weight of the diamond, in carats}
#'   ...
#' }
#' @source \url{http://www.diamondse.info/}
"diamonds"Our package can also include vignettes that demonstrate how to use the functions of the package to solve a specific problem. We can see the vignettes of a package by typing browseVignettes("packagename").
We can write a vignette using R Markdown and knitr. We can start creating a vignette by running
usethis::use_vignette("myvignette")This creates a vignettes/ directory and drafts the vignette vignettes/myvignette.Rmd. It also adds the necessary dependencies to DESCRIPTION (adds knitr to the Suggests and VignetteBuilder fields).
The first few lines of the vignette will be a YAML header with metadata as follows:
---
title: "Vignette Title"
output: rmarkdown::html_vignette
vignette: >
  %\VignetteIndexEntry{Vignette Title}
  %\VignetteEngine{knitr::rmarkdown}
  \usepackage[utf8]{inputenc}
---
Here, symbol > indicates the following lines are plain text that do not use any special YAML features. After the header we write the vignette using R Markdown intermingling text and R code.
We can run the vignette by using knitr. We can use devtools::build_vignettes() to build vignettes. The resulting .HTML vignette will be created in the inst/doc folder. Alternatively, by executing devtools::build() the .HTML vignette will be built as part of the construction of the .tar.gz file for the package bundle.
https://r-pkgs.org/tests.html
It is important to test the R code in the package to make sure there are no bugs and everything works as expected.
When we are developing a package, we test the code in an informal way. It is worth it to keep these tests as part of our package so we can rerun them whenever is needed to ensure the package continues working well and discover bugs in the code.
The package testthat allows us to write automated tests about expectations on how the functions of our package should work. That is, we can check that given a set of inputs, the functions return the expected outputs.
We can set up our package to use testthat by running:
usethis::use_testthat()This creates a tests/testhat directory, adds testthat to the Suggest field in the DESCRIPTION, and creates a file tests/testthat.R that runs all tests when we check our package.
Then we need write our tests in test/testhtat and run them with devtools::test().
Tests are organized in a hierarchical way, namely, expectations are grouped in tests, and tests are grouped in files.
Expectations are functions that describe the expected result of a computation. Expectations start with expect_ and have two arguments: the actual result and what we expect. If the actual and expected result do not agree testthat throws an error.
A test groups together a set of expectations to test a unit of functionality. A test is created with test_that() passing the test name and code block as arguments.
Then tests are organized in files which are given a name with context().
Below is an example of a test file from the stringr package:
context("String length")
library(stringr)

test_that("str_length is number of characters", {
  expect_equal(str_length("a"), 1)
  expect_equal(str_length("ab"), 2)
  expect_equal(str_length("abc"), 3)
})
#> Test passed 😸

test_that("str_length of factor is length of level", {
  expect_equal(str_length(factor("a")), 1)
  expect_equal(str_length(factor("ab")), 2)
  expect_equal(str_length(factor("abc")), 3)
})
#> Test passed 🥇

test_that("str_length of missing is missing", {
  expect_equal(str_length(NA), NA_integer_)
  expect_equal(str_length(c(NA, 1)), c(NA, 1))
  expect_equal(str_length("NA"), 2)
})
#> Test passed 🎉https://r-pkgs.org/license.html
License for the R package is specified in the DESCRIPTION file in License: typelicense. We can also specify License: file LICENSE, and create a text file called LICENSE that explains the type of license.
The license contains how the code can be inspected, modified, and distributed. The usethis package has several functions to create a number of licenses including the following:
MIT license (use_mit_license()) is a permissive license that allows people to use the code with minimal restrictions
GPLv3 license (use_gpl_license()) is a copyleft license so that all derivatives of the code are also open source
If we do not want to make the code open source we can use use_proprietary_license(). These packages cannot be distributed by CRAN
For packages that primarily contain data, not code, we can choose Creative Commons licenses such as the CC0 license (use_cc0_license()) if we want minimal restrictions, or the CC BY license (use_ccby_license()) if we require attribution when someones uses the data
https://r-pkgs.org/inst.html?q=citation#inst-citation
In R, we can execute citation() to get a citation of R, and citation("packagename") to get a citation of a particular package.
We can add a citation for our package by adding a file in inst/CITATION similar to this:
citHeader("To cite lubridate in publications use:")

citEntry(entry = "Article",
  title        = "Dates and Times Made Easy with {lubridate}",
  author       = personList(as.person("Garrett Grolemund"),
                   as.person("Hadley Wickham")),
  journal      = "Journal of Statistical Software",
  year         = "2011",
  volume       = "40",
  number       = "3",
  pages        = "1--25",
  url          = "https://www.jstatsoft.org/v40/i03/",

  textVersion  =
  paste("Garrett Grolemund, Hadley Wickham (2011).",
        "Dates and Times Made Easy with lubridate.",
        "Journal of Statistical Software, 40(3), 1-25.",
        "URL https://www.jstatsoft.org/v40/i03/.")
)We can create a README.Rmd file with a description of the package, installation instructions and basic examples. usethis::use_readme_rmd() creates a template README.Rmd and adds it to .Rbuildignore. devtools::build_readme() can be used to render the document to README.md. README.md is rendered by GitHub on the main page.
https://r-pkgs.org/whole-game.html?q=readme#use_readme_rmd
https://r-pkgs.org/release.html?q=readme#readme-rmd
NEWS.md can be created to track the changes from one version of a package to another. We can create this file with usethis::use_news_md().
https://r-pkgs.org/release.html?q=news#news
A package name can only consist of letters, numbers and periods (no - or _). The name must start with a letter and cannot end with a period. The available::available("packagename") function can be used to see whether a package name is available.
https://r-pkgs.org/workflows101.html
CRAN is the main repository for R packages. When R packages are contributed to CRAN, R users can easily discover and install them with
install.packages("packagename")You can read about the submission process to CRAN here: https://r-pkgs.org/release.html
pkgdown packageTo create a website for our package with pkgdown, we need to have an R package with a local directory and a GitHub repository. Then, from within the package directory we run:
# Install released version from CRAN
install.packages("pkgdown")

# Run once to configure your package to use pkgdown
usethis::use_pkgdown()

# Build website
pkgdown::build_site()
This generates a docs/ directory with the website. The README.md is shown in the homepage, the documentation in man/ generates a function reference, and the vignettes are shown into articles/.
We can customize the website following https://pkgdown.r-lib.org/articles/pkgdown.html
We can publish the website online in GitHub Pages. When pushing the changes, we need to make sure the docs directory does not appear in the .gitignore file. Then we need to configure GitHub Pages to use the docs directory.
hexsticker for packages: https://github.com/GuangchuangYu/hexSticker