Presentations with R Markdown
1 References
- Presentation: https://slides.yihui.org/xaringan/
- Presentation: https://arm.rbind.io/slides/xaringan.html
xaringanwiki: https://github.com/yihui/xaringan/wiki
2 Presentations with
beamer (PDF)
We can create a Beamer presentation from R Markdown by specifying
output: beamer_presentation in the YAML of the
.Rmd document. We can use the # and
## heading tags to create slides with a header, and a
horizontal rule --- to create slides without a header.
https://bookdown.org/yihui/rmarkdown/beamer-presentation.html
Create a Beamer presentation.
3 Presentations with
xaringan (HTML)
The R package xaringan can be used to create HTML5
presentations with remark.js through R
Markdown. The presentations are rendered by remark.js on the web
browser, and the Markdown source needed by remark.js is
generated from R Markdown (knitr). Example slides can be
seen at https://slides.yihui.org/xaringan/ and https://arm.rbind.io/slides/xaringan#1
Creating a xaringan
presentation
To create a xaringan presentation, we first need to
install the xaringan package
# Download from CRAN
install.packages("xaringan")

# or download the development version from GitHub
# remotes::install_github("yihui/xaringan")
Then, we can easily create a xaringan presentation from
the menu by clicking
File > New File > R Markdown > From Template > Ninja Presentation
and then clicking the Knit button to compile the
presentation.
The output format of a xaringan presentation is HTML.
However, we can create a PDF document by opening the slides in a web
browser and printing them to PDF.
YAML header
The YAML header of the R Markdown file specifies some metadata such
as the title, author and date. The output format is
output: xaringan::moon_reader.
Separation slides
Slides are separated with three dashes ---. The first
slide automatically starts where the YAML header ends so we do not need
to write --- to create it.
Create a presentation by creating the following .Rmd file and
clicking the Knit button
---
title: "Presentation"
subtitle: "xaringan"
author: "Paula Moraga"
date: "2023-03-16"
output: xaringan::moon_reader
---

One slide

---

Another slide
Headers
A header for the slide is created using a # before a
line of text. Smaller headers are created with more #
symbols.
Create a presentation by creating the following .Rmd file and
clicking the Knit button
---
title: "Presentation"
subtitle: "xaringan"
author: "Paula Moraga"
date: "2023-03-16"
output: xaringan::moon_reader
---

# Header 1

One slide

---

# Header 2

## Subheader

Another slide
R Markdown syntax
We can write R Markdown syntax such as bold or italic text and math equations.
Incremental reveals
We can make elements on the slides to appear with a click by
separating them with two dashes --.
Space
We can add more space between the elements on a slide by using the
HTML tag <br>.
Color
https://bookdown.org/yihui/rmarkdown-cookbook/font-color.html
To put text in color, wrap the text in the <span>
tag and set color with CSS.
<span style="color: red;"> text </span>Create a presentation by creating the following .Rmd file and
clicking the Knit button
---
title: "Presentation"
subtitle: "xaringan"
author: "Paula Moraga"
date: "2023-03-16"
output: xaringan::moon_reader
---

# Header 1

**This is bold text**

--

*This is italic text*

--

$$\int_0^\infty e^{-x^2} dx=\frac{\sqrt{\pi}}{2}$$

---

# Header 2

Text 1

Text 2

<br>

Text 3

<span style="color: red;"> Text 4 </span>
Aligning slides
By specifying class: inverse, center, middle at the
beginning of the slide we will inverse the color (inverse),
center the elements horizontally (center) and vertically
(middle).
Horizontal alignment can be
left,centerorright.Vertical alignment can be
top,middleorbottom.
Create a presentation by creating the following .Rmd file and
clicking the Knit button
---
title: "Presentation"
subtitle: "xaringan"
author: "Paula Moraga"
date: "2023-03-16"
output: xaringan::moon_reader
---

class: left, top

Horizontal alignment `left`. Vertical alignment `top`

`class: left, top`

---
class: center, middle

Horizontal alignment `center`. Vertical alignment `middle`

`class: center, middle`

---
class: inverse, right, bottom

Horizontal alignment `right`. Vertical alignment `bottom`

`class: inverse, right, bottom`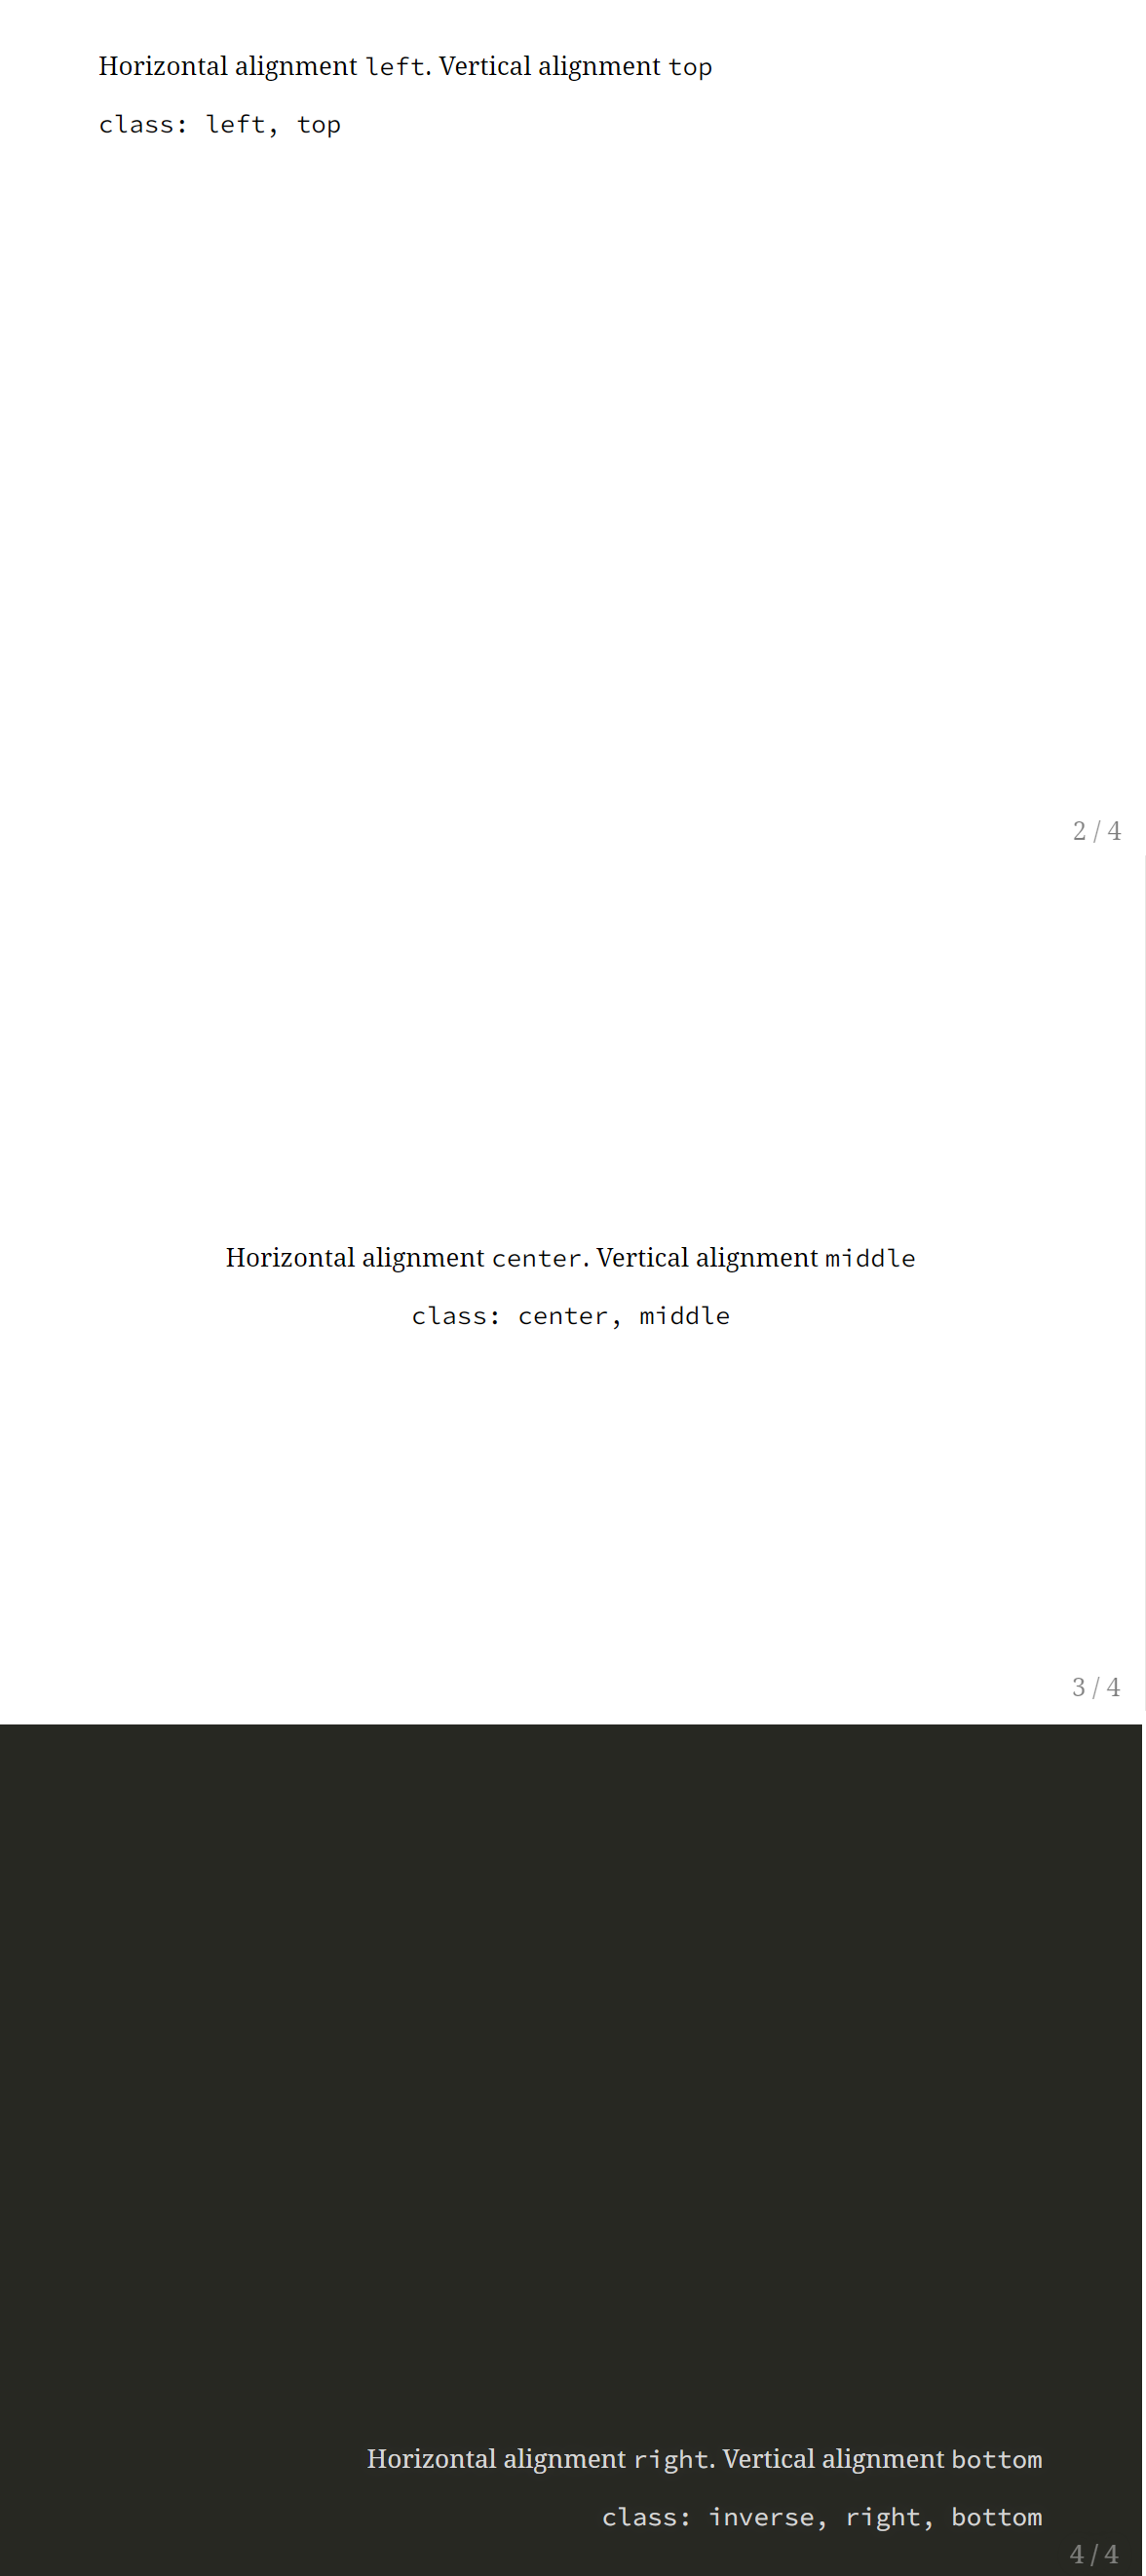
Aligning text
Text can be horizontally aligned
.left[text]
.center[text]
.right[text]
Create a presentation by creating the following .Rmd file and
clicking the Knit button
---
title: "Presentation"
subtitle: "xaringan"
author: "Paula Moraga"
date: "2023-03-16"
output: xaringan::moon_reader
---

# Aligning text

.left[text left]
.center[text center]
.right[text right]
Images
Images or GIFs can be added by writing
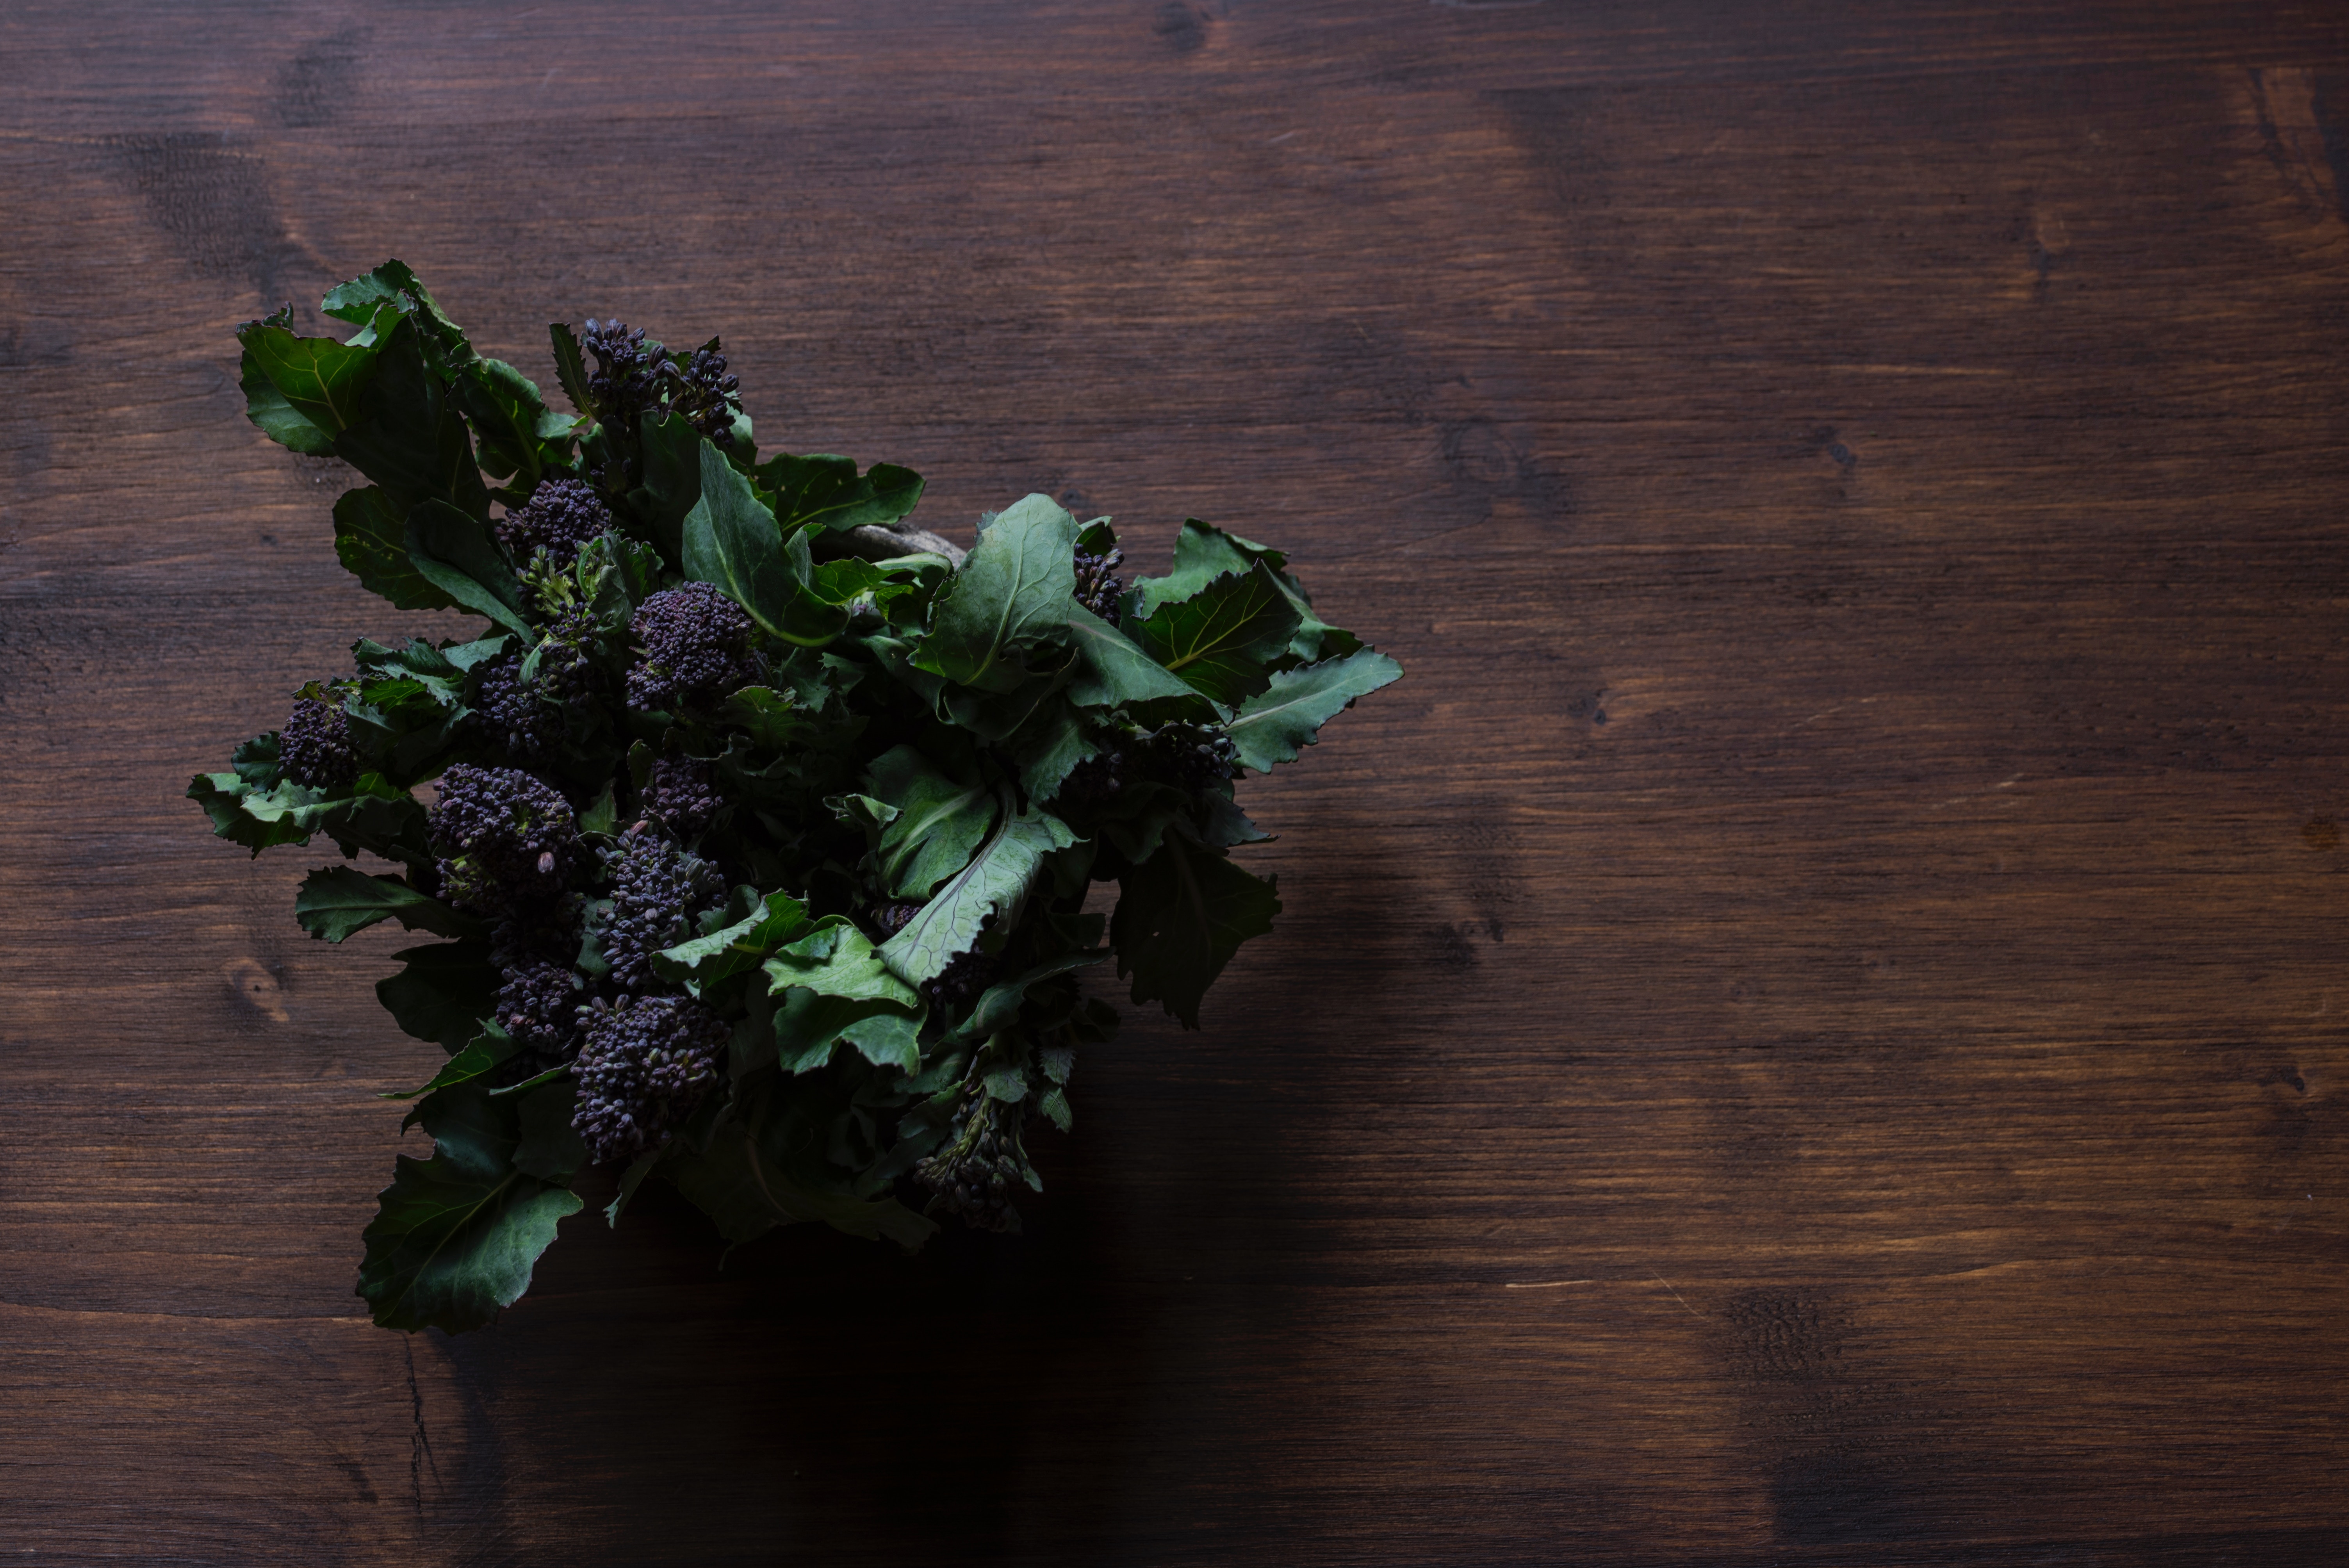
To control size we can use
```{r, out.width = '50%'}
# url
knitr::include_graphics("http://bit.ly/arm-greens")
# local image with relative path
knitr::include_graphics("img/arm-greens.jpg")
```
Or HTML syntax
<img src="http://bit.ly/wiki-toddy" width="15%" align="right" />
Create a presentation by creating the following .Rmd file and
clicking the Knit button
---
title: "Presentation"
subtitle: "xaringan"
author: "Paula Moraga"
date: "2023-03-16"
output: xaringan::moon_reader
---
# Header 1
Two columns
 can be written with .pull-left[] and
.pull-right[]. These are each 47% width.
It is also possible to use .left-column[] and
.right-column[]. The widths are 20% and 75%.
---
class: inverse, center, middle
# Slide
.pull-left[
...

]
.pull-right[
...

]
Create a presentation by creating the following .Rmd file and
clicking the Knit button
---
title: "Presentation"
subtitle: "xaringan"
author: "Paula Moraga"
date: "2023-03-16"
output: xaringan::moon_reader
---
# Two columns
.pull-left[
Column left

]
.pull-right[
Column right

]
Background images
We can add background images with background-image:. The
size can be adjusted with background-size:.
background-sizecoverrescales and crops with no empty space, andcontainonly rescales.
background-image: url(https://blah.bla)
background-size: cover
Create a presentation by creating the following .Rmd file and
clicking the Knit button
---
title: "Presentation"
subtitle: "xaringan"
author: "Paula Moraga"
date: "2023-03-16"
output: xaringan::moon_reader
---

class: center, middle

# Background images

---
background-image: url(https://bit.ly/arm-greens)

#  No background size

---
background-image: url(https://bit.ly/arm-greens)
background-size: cover

#  `cover` rescales and crops with no empty space

---
background-image: url(https://bit.ly/arm-greens)
background-size: contain

# `contain` only rescales
Logo
If we wish to add a logo we can treat it like a background image.
---
YAML
---

layout: true

background-image: url(img/RStudio-Logo-Flat.png)
background-position: 0% 100%
background-size: 10%
---
Options for background-position: include
bottom left: 0% 100%
top right: 100% 0%
bottom center: 50% 100%
This will apply layout: true to all slides. To cancel
it, we need to insert a blank slide:
---
layout: false
---
Create a presentation by creating the following .Rmd file and
clicking the Knit button
---
title: "Presentation"
subtitle: "xaringan"
author: "Paula Moraga"
date: "2023-03-16"
output: xaringan::moon_reader
---

layout: true
background-image: url(https://bit.ly/arm-greens)
background-position: 100% 0%
background-size: 10%

---
# Slide 1

---
# Slide 2

---
layout: false

# Slide 3
Title slide
If we would like to create our own title slide we need to disable
xaringan’s title slide with the option
seal = FALSE of moon_reader.
output:
  xaringan::moon_reader:
    seal: false
For example, we can create our own title slide as follows:
output:
  xaringan::moon_reader:
    seal: false

---
class: inverse, center, middle
background-image: url(figs/image.png)
background-size: cover

# R Markdown presentations

<img src="figs/blue_jane.png" width="150px"/>

### using xaringan

.large[Paula Moraga | KAUST Conference | 9 July 2020]
---
Create a presentation by creating the following .Rmd file and
clicking the Knit button
---
title: "Presentation"
subtitle: "xaringan"
author: "Paula Moraga"
date: "2023-03-16"
output:
  xaringan::moon_reader:
    seal: false
---

class: inverse, center, middle
background-image: url(https://bit.ly/arm-greens)
background-size: cover

# R Markdown presentations

<img src="http://bit.ly/momtocat" width="150px"/>

### using xaringan

.large[Paula Moraga | KAUST Conference | 9 July 2020]

---

# Slide 1

---

# Slide 2
Code and plot side by side
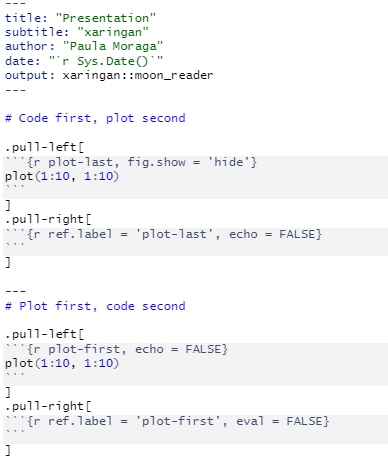
Create a xaringan presentation that includes HTML widgets such as leaflet maps or datatables
Share the presentation online in GitHub Pages